Showing posts with label tutorial. Show all posts

Friday, July 8, 2011

pencil skirt from T-shirt tutorial

 shirt: Forever 21
shoes: Burlington Coat Factory
jacket: Target
scarf: stole from little sister
skirt: made by me


so yesterday it decided to pour rain!!  it was so loud!  right when i was going to go outside and take some really awesome outfit pictures in started pouring!  not sprinkling or even just raining...it was like a flash flood! haha okay maybe it wasn't THAT bad but there was a lot of liquid falling from the sky.  so i decided to take them on the porch with the rain...i really wish i had an umbrella!  anyways this is my favorite skirt so far!!  i love everything about it!  i love the color, the length and how tight it is!!  i made it last night for an outfit because i wanted a new skirt to wear the next day...if you haven't noticed i do thin A LOT! haha anyways it only took me about 10 minutes to make!  seriously it is the easiest skirt i think i have ever made!  i love how stretchy and tight it is!!  it shows off my HOT CURVES!!  haha.  i have troubles dressing to my body type just because its so weird!  i have like two hips haha...its not fat, either its bone...so i tried to stay away from tight fitting clothes just because i was so uncomfortable with my body.  this was a time that i had low self esteem issues but i have learned to embrace my body and to love me for what i look like!  so BAM!  here is me embracing my body and loving every part of it!

p.s. this scarf is really a dress! shhhh!! haha


this skirt was originally a shirt!  i wasn't sure what to do with a large sized shirt at first.  i wasn't sure if i should take it in and restyle it or if i wanted it to be something else but when i finally decided that it would be a skirt i knew exactly how i wanted it!

so while i was making this skirt i took pictures like i always do for the tutorial, but i felt that the pictures didn't really explain how to do it, so i decided to make a collage type thing with instructions.  here it the tutorial!


1. cut off the sleeves and just under the arm pit...i hate that word...arm pit.  it sounds so gross!

2. instead of the belly part of the shirt that you just cut off being horizontal like in the picture turn it so that its vertical...do you get what im saying?  so naturally you would want to use the holes already there but you're NOT! turn it and cut the other sides so now you have two separate pieces that aren't attached at all.  now you will sew the two vertical sides...these are the longer sides.  you're doing this so that your skirt is longer and you also wont have to take it in as much...i hope im explaining this all right so far.  important!  stretch the fabric while you're sewing so that your stitches don't rip when you put it on.

3.  sew both of your sleeves together so that it makes a circle.  this will be your waistband.  also stretch your fabric in this step

4.now you will sew your waistband to your skirt.  to do this you will place the waistband (right side out) inside the skirt (wrong side out).  when you turn the skirt right side out both the skirt and the waistband will be right side out, not showing any stitches.  also stretch your fabric while sewing in this step

Saturday, July 2, 2011

bohemian bun tutorial


this is one of my all time favorite hairstyles to do.  its so easy and it takes me about 10 minutes to do!  i really love hairstyles that dont take much time to do because the less time it takes me to do my hair the later i can sleep in for school! haha.  my hair is short, so i have to use lots of bobby pins and it doesn't stay in a bun all too well, but if you have longer hair then it will work great.  here is how you do it!


first i brushed out my hair ( i always do this right after i get out of the shower when my hair is wet because its easier to work with) and i started twisting my bangs, you could either twist or braid, but i twist because im not very good at braiding my bangs

then once i twisted my hair i brought it to the back of my head and pinned it.  try to pin it as low as you can so that when you make your bun you wont see the bobby pins...i obviously fail at this. haha its okay though.  i always put the oins in so that they are criss crossing , they always stay in better when i do this.

after i twisted and pinned my hair i brought it back into a low pony tail

then i twisted my hair into a bun and pinned it.  once i did this i made sure that all the lose hairs were pinned and i sprayed it with hair spray.


Thursday, June 30, 2011

two for one special

skirt/ shirt: thrifted (refashioned)
Gap shorts: Platos Closet
belt: forever 21
jean jacket: Target
lace shirt: Forever 21
boots: Walmart
scarf: Charlotte russe

This is probably the best and easiest refashion i have ever done!  it seriously took me like 5 minutes!!  im really happy with how it turned out too!  i think its super cute and i love that i can wear it either as a shirt or a skirt.  its one piece of of clothing but it could make two totally different outfits!  i love both of these outfits, but i think my favorite is where im wearing it as a shirt.  when its a shirt its just so loose and relaxed and it looks so cute with a belt!

p.s.  i really love my makeup!!  haha i think i did a good job.  im pretty much makeup illiterate so i usually dont put a lot on, but i think i did a really good job!  i even put eyeliner on!  oooh! haha

p.p.s.  im doing my first hair tutorial tomorrow!!  excited?  me too! haha im going to show you how to do THIS hairstyle!

 this is what it looked like before.  it was a dress and about three sizes too small!! haha


now for the tutorial!

first i measured how long i wanted it to be and i cut it...with scissors.  so complicated! haha

then i measured some elastic big/ small enough to snugly fit me.  then i pinned and sewed it.  that's it!!  isn't that the easiest refashion ever???  i think it is! haha.  have a wonderful Thursday!!


Meet Virginia Design


Friday, June 24, 2011

restyled jellies

  restyled shirt: Ross
leggings: Target
jean jacket: Target
restyled jellies: Target
ring: Rue 21


arent these so cute??  i seriously cannot believe that i thought of this! haha.  i was just looking through my closet while cleaning my room and i saw them and thought...hey i should weave fabric into them! haha.  they look really cute with this outfit too.  i was so tempted to make ANOTHER circle scarf for this outfit...i have a problem...im obsessed with my circle scarves!  haha.  pretty soon i will have one in every color!  but its okay because i stopped myself!  it was going to be hot pink to match the shoes but then i thought to myself...i hate hot pink and it really doesn't look good with this outfit.  haha...anyways don't you just love my my middle part??  i was soooo brave today! haha.  i think it looks pretty cute though....anyways here is how i redid my shoes!


1. find some old jellies.  i found mine at Target.

2. you will need scissors, fabric, jellies (or shoes that have holes so you can weave fabric through them) , and  a hot glue gun

3. first cut out strips of fabric

4.  start weaving your fabric!  i started at the top.  whenever you start a new strip of fabric just put some hot glue onto it and press it down firmly before you start to weave.


Tuesday, June 21, 2011

braided headband tutorial


i made this headband for my outfit yesterday.  i think it is really cute!  i love how big the braids are and i love how it is fraying!  just in case you were wondering, this is my beautiful sister Kelsie!  she is the one always behind the camera.  thanks to her i have so many cute photos of my outfits on my blog!  shes older than me by 5 years and most people think that im older than her. hahaha...she doesn't like it.  this one time she went into the nursery at church with her kids ( she has two) and the lady in there asked her what her brothers name was! haha she wasn't very happy about that haha.

don't you love her shorts??  they're cute huh??  they used to be blue jeans!  we both bleached our jeans...mine still have some bleaching to do but when they're done i will most certainly share!  so anyways here is the tutorial!


 you will need  some fabric, elastic, and a pair of scissors
 first measure your head and cut a strip of fabric long enough for your head and wide enough to braid.  then cut that strip of fabric into thirds, but when you get to the end leave some fabric uncut
 then braid the fabric.  i did two sets of braids
 then cut a piece of elastic out and sew the braided end that is cut to it. trim off the extra fabric
 once it is sewn and trimmed, take the other braid with the uncut side...
 and wrap it around the other braid so that you cant see the messiness anymore
then sew it on.  do this to both sides and you're done!

Saturday, June 18, 2011

freezer paper stenciled shirt


shirt: made it
shoes: Walmart
GAP shorts: Platos Closet
scarf: i made it
ring: forever 21
headband: Target

 this is my new shirt!!  i LOVE how it turned out!!  i have never freezer paper stenciled anything before so this was kind of an experiment.  this used to be my boyfriends shirt...its mine now!!  hahaha.  i love how this whole outfit meshes together, its really summery and light.  i also really like the color combo!  the teal goes really well with the bright yellow!  speaking of the bright yellow...this is another circle scarf!  i really like making these because they're sooo easy and really cute!  at first i tried to dye this with mustard  (it used to be white) but it didn't turn out as good as i thought it would...next time i think i will leave it on for longer next time.  so after that didn't work i just dyed it all yellow with yellow RIT dye.

This whole outfit cost around $11!!  the shirt was free and so was the scarf then the shorts were only $5...i love platos closet! haha.  then the sandals were $3 and the ring was also $3!  i love cheap clothes!  haha who doesn't??  oh and i forgot to mention the hair!  i have been trying different hair styles lately and i really like this one!  its a hair bow!  literally!  it didn't take much time to do and it was really easy but it took a lot of bobby pins!  i will be doing a tutorial on it soon!

im always the last person to find out about things!  i must live under a rock or something...i didn't know how to freezer paper stencil until a couple of days ago...and have you heard of kid history on you tube??  of coarse you have because everybody has seen it except for me!  well i was watching it like all day yesterday  hahaha it it so funny!  me and my sister have been quoting it like non stop!!  "don't.....punch.....our car"! hahahah....wait wait this one is my favorite... "are you jumping on the trees?!?  are you jumping on the houses?!? haha wow...i need to get out of the house more.  so if you live under a rock like me and don't know how to freezer paper stencil, yay im not alone and here is a simple tutorial i put together for you!  you're welcome :)
 
 first you will need some freezer paper and a t shirt, i stole mine from my boyfriend...well he actually gave it to me but whatever...and you will need an exact o knife to cut it out.

 after you cut out your pattern whatever it might be now you iron it onto your shirt with the waxy side down.  once it is stuck to your shirt you can start painting it! yay!!

once it is all painted and dry you can remove the paper and iron the shirt.  when you iron your shirt you will need to put a piece of fabric over it so that your shirt doesn't get ruined.  once you have ironed it stick it in the washer.  tada now you have a beautiful new shirt!


Wednesday, June 8, 2011

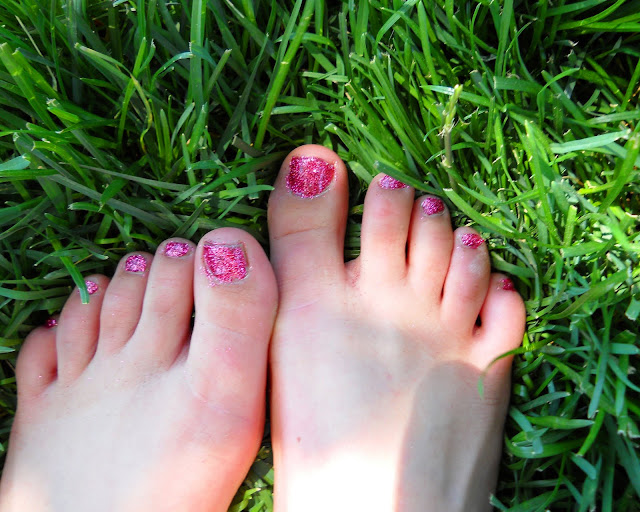
DIY easy peasy glitter toes


i think im in love!!!  i think glitter toes are the cutest ever!  how could you resist sparkles??  haha.  i love glitter toes, but there was one problem....they are expensive!  i hate paying for things that i could do myself...i mean who doesn't?  seriously.  these took about 15 minutes, they kinda take a long time (for nails) but they are soooo easy!!  can you tell that im excited??  haha. heres how to do them!  you're welcome!


you will need some glitter and clear finger nail polish.  the brand of glitter that i have is Martha Stewart.  its kinda spendy though... you don't need expensive glitter to do this.  i would get cheap glitter, but i already had this in my house, so i used it.


first i brushed an a heavy coat of clear polish and poured glitter over it...it could get messy, correction, this is messy so you will need something under your foot.  i did my nails outside so i wouldn't have to clean up all the spilled glitter and plus it finally stopped raining! haha...anyways back to the nails... i did each nail at a time so that the polish was fresh and sticky. p.s. when you pour your glitter onto the polish make sure you press it down so that it sticks!  got it?? okay moving on...

after you pour the glitter over your nails wait a little bit so that the polish can dry and brush the extra glitter off with a paint brush.  now is the time to fill any spaces you missed!  if it all looks good then brush a top coat of clear polish over the glitter and wait for it to dry.  when it is all done drying apply a second coat then you're done!!  easy peasy, huh??